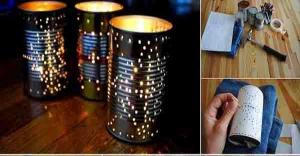
DIY Outdoor Can Lantern

There are actually a lot of things you can do to beautify the outside appearance of your house. You can make your own garden outside. You can plant it with green vegetables and beautiful flowers to make the outside appearance of your house more beautiful. But if you want to have a classy and stylish garden that you can use as a hangout area for your family and friends, then consider making a DIY outdoor can lantern. Yes, can lanterns. It is possible? Absolutely, yes!
There are only simple materials needed in making can lanterns. You will need to get a towel, candles, scissors, masking tape, pencil, paper, colorful permanent markers, nails, hammer, and tin cans of course. What you need to do first is clean the tin cans thoroughly. Afterwards,fill the cans with water and place them into the freezer until the ice is formed inside the cans. The ice will stabilize the can so it keeps its shape when you are using the hammer and nails. Afterwards, you must create your own design or pattern on the paper and paste it on the cans. You can then put some holes into them using the nail and a hammer. Make sure that you only put holes on the lines of your pattern. It is just like you are drawing something using a nail. After that, you can remove the paper where you have drawn your pattern. Wash the can well until the ice becomes water again and wait until they become dry again. You can actually put some colors into the cans so that it will look more vibrant and beautiful. Simply use the colorful markers you have got. Thereafter, light some candles and put one to each tin can, and then hang it into your garden. This is how simple it is.
This will surely make your garden a romantic and classy place during the night. However, make sure that the can lanterns are away from fire-triggering materials to avoid any chance of fire.
Learn MORE at Inhabitat
To help with slow website load, we have put all photos for this article here: View photo gallery.