Salmon Cakes With Garlic Sauce
Ingredients
1 lb salmon
1⁄4 cup dry breadcrumbs
1⁄4 teaspoon garlic powder
1 tablespoon dill (for salmon cakes)
1 teaspoon kosher salt
1⁄2 ounce green onion, finely chopped
1 egg
4 tablespoons olive oil mayonnaise
1 teaspoon spicy brown mustard
1 teaspoon hot sauce
1 teaspoon Worcestershire sauce
1 tablespoon lemon juice
1⁄2 cup bell pepper
1⁄2 teaspoon seafood seasoning (such as Old Bay)
1 cup fat free Greek yogurt (for sauce)
1 tablespoon lemon juice (for sauce)
1 tablespoon dill (for sauce)
1 medium garlic clove, minced (for sauce)
1⁄4 teaspoon kosher salt (for sauce)
Directions
Set aside ingredients for sauce to be mixed separately.
Mix together salmon, chopped dill, garlic powder, and kosher salt. NOTE: fresh salmon tastes much better, but canned salmon can also be used. Add pepper as desired.
Chop bell pepper finely. Beat together egg, yogurt, hot sauce and mustard and blend with ingredients in the bowl.
Combine all ingredients (except ailoi ingredients) and mix well. The mixture will appear loose, which is how it's supposed to be. Most recipes load up on bread crumbs as a binder, which makes the patties more firm, but also cheats you out of some of the beautiful salmon.
Set out sheets of wax paper that are larger than the salmon cakes. Season bread crumbs with a little bit of salt and pepper and place in a shallow bowl. Dust a bit of the wax paper with the bread crumb mixture, then place 1/12 of the salmon mixture on top. Form into patties (I used a ring mold).
NOTE: with a good teflon pan, you shouldn't need to use oil or cooking spray.
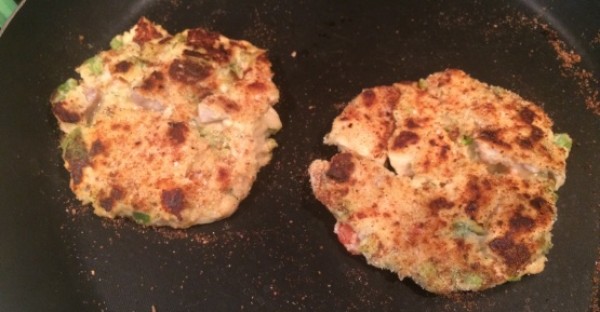
Heat a pan to medium temperature. Pick up the wax paper along with the salmon patty, then flip over onto the pan, discarding wax paper sheet. Cook for about 3 minutes, then flip over and cook for 2-3 minutes, or until lightly brown.
Mix sauce ingredients together thoroughly and top as desired.
Learn MORE / Get RECIPE at Rob P via Food.com
To help with slow website load, we have put all photos for this article here: View photo gallery.